Creating a Content Group
What are Content Groups?
Content groups allow you to specify which layout elements should belong to an article. They consist of text and graphic boxes that are combined into a group. In order for articles from the CMS to be correctly assigned to the boxes, you must define content types such as body text, headline, caption, or credit.
When you create a graphic box, it becomes an image group Image 1 in a content group, regardless of whether you are working with image groups or not. An image group can contain one or more graphic boxes, but always only one caption and one credit. The caption and credit then apply to all images within an image group.
Create Content Group
- Create the text and graphic boxes you need.
- To define the content types, right-click a text box and choose between Body Text, Heading, Caption, Credit, and Quote under Content type. You do not need to assign a content type to graphic boxes.
- Once you have assigned a content type to each text element, select all text and graphic boxes that should belong to a content group – that is, to an article.
- Open the Content Groups palette under Window -> Content Groups.
- To create a content group, drag the selected elements to the open Content Groups palette. Alternatively, you can right-click the boxes and select Create New Content Group.
- To assign a name to the content group, double-click the group’s title in the Content Groups palette. Now you can edit it.
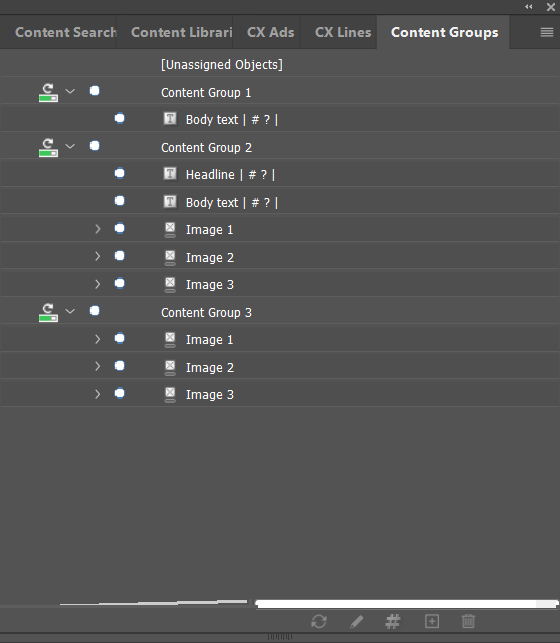
Faulty and unassigned objects
In the Content Groups palette, text elements with errors are displayed in red font. Faulty text elements are those that have not been assigned to a content group or that do not have a content type. Captions and credits that cannot be assigned to an image and images that are not associated with DC-X are also highlighted in red. In addition, content groups that contain erroneous elements are displayed in red font. There is a tooltip with the error description for the faulty elements.
In the Unassigned Objects folder of the Content Groups palette, text elements are colored red if they have a content type. This is a hint to check if these elements were accidentally not assigned to a content group.
Connect caption with image
If you want to use captions and/or credits, they must be associated with the corresponding image.
- Create the text and image boxes you need.
- Assign the caption or credit content type to the text boxes.
- Select the caption and credit text boxes and the graphics box.
- Right-click the selected elements.
- Select Connect Caption to Graphic Frame or Connect Credit to Graphic Frame or Connect Caption and Credit to Graphic Frame.
Placing quotes
- Create a text box for the text of the quote and a text box for the author.
- Assign the content type Quote to the text box for the quote text and the content type Cite to the text box for the author of the quote.
- Select both text boxes and drag and drop them onto a content group in the Content Groups panel. Alternatively, you can add them to a content group by right-clicking under Assign to Content Group.
- Group both boxes in InDesign so they can be moved together.
- In WordPress, add the Quote block.
Placing info boxes
- Create a text box for both the title and the text of the info box.
- Assign the infobox_headline content type to the text box for the title and the infobox_body content type to the text box for the info box text.
- Select both text boxes and drag and drop them onto a content group in the Content Groups palette. Alternatively, you can add them to a content group by right-clicking under Assign Content Group.
- Group both boxes in InDesign so they can be moved together.
- In WordPress, add the Info Box block.
Creating lists
In the main text of the InDesign document, you can use numbered lists or bulleted lists.
- To do this, insert list blocks in WordPress. In their settings, you can choose between Ordered list, which is a list with numbering, and Unordered list, which is a list with bullets. You can specify the respective list level using the Indent list item and Outdent list item buttons.
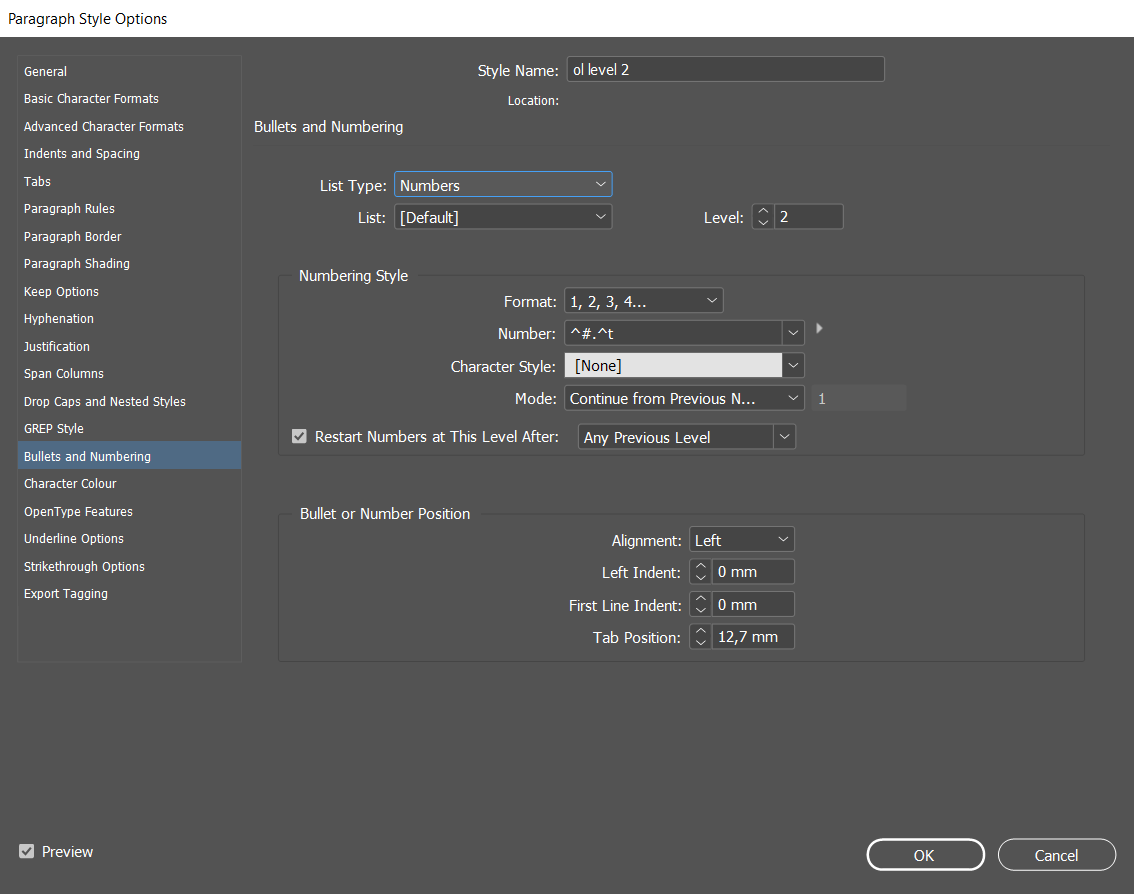
- For each level, you must define a paragraph style in InDesign. In the paragraph style options, you can define the bullets or numbering and select the corresponding list level.
Mapping of lists in WordPress
You have to do the mapping of the lists in the admin area under Mapped Styles, specifying the name of the paragraph styles in InDesign. For example, this may look like this:
| WordPress block | Name of paragraph style in InDesign (by name of paragraph style in InDesign) |
| List (unordered) | |
| Level 1 | ul |
| Level 2 | ul level 2 |
| Level 3 | ul level 3 |
| List (ordered) | |
| Level 1 | ol |
| Level 2 | ol level 2 |
| Level 3 | ol level 3 |
Manage Content Groups
Adding elements to Content Groups
- Assign content types to all elements that are to be added.
- Select the elements.
- Drag and drop them to the desired content group in the Content Group palette.
Alternatively, right-click the respective element under Assign to Content Group to select the desired content group.
Moving elements to other Content Groups
- Right-click the element that you want to move.
- Under Assign Content Group, select another content group.
Or:
- Open the Content Groups palette.
- Select one or more elements to be moved.
- Drag and drop the element(s) to the desired content group.
Removing elements from Content Groups
- Right-click the element that you want to remove from a content group.
- Under Assign to Content Group, select another content group or No Content Group.
Rename Content Groups
- Open the Content Groups palette.
- Double-click the title of the content group to edit it.
- Confirm the new title by pressing the Enter key.
Delete Content Groups
- In the Content Groups palette, click the content group you want to delete.
- Select the trash icon at the bottom of the tab.
- Confirm the operation.
![]() Additional information: If you delete all elements of a content group in the InDesign document, the group is also deleted.
Additional information: If you delete all elements of a content group in the InDesign document, the group is also deleted.
Assigning Content Groups to libraries
When a content group is added to an InDesign library, it can be placed in other documents from there. A new content group is then created in this document. If the library elements are placed several times in a document, several content groups with the same name are created. Therefore, the content group should be renamed after placement.
You can also place individual elements of a group in a library. When placing such individual elements, a content group is also created in the document. The prerequisite for this is always that the element was assigned to a content group. Elements that were not assigned to a group can also be placed in libraries and placed again. You can find them in the category Unassigned Objects.
- To export a content group to a library, open the Content Groups palette.
- Select one or more content groups.
- Open the menu in the upper-right corner of the Content Groups palette.
- Select Export selected Content Groups to the library or Export all Content Groups to the library. A new window will open.
- From the menu at the bottom, select Migrate library object to CC Libraries.
- Now choose between a new CC Library and an existing one.
- Confirm the process with OK.
Define text styles
To ensure that the formatting from the CMS article is correctly implemented in InDesign or the formatting from InDesign is correctly implemented in the CMS article, text styles have to be defined. A distinction is made between paragraph styles and character styles. You can first define these in InDesign as usual.
Basically, the texts from the Web CMS are inserted into the correct text boxes using the content type information. The paragraph and character styles of the text box are used and InDesign follow-on styles are also applied. If individual paragraphs or characters are to be specifically formatted in the Web CMS, explicit style mapping is necessary. Typical examples are interlines or placemarks. The style mappings are defined in the administration menu and define the relationship between the CSS class in the Web CMS and the InDesign styles.
Set paragraph styles
Paragraph styles to be used in the body text must exist as placeholders in the text boxes. To do this, for example, write “Heading 2” in a text box and format this paragraph with the paragraph style you have provided for it.
If you have assigned a paragraph style to the objects in the content groups or if you have formatted placeholder text with paragraph styles, articles are formatted according to these specifications.
Set character styles
Character styles are translated using the same logic as paragraph styles when reading and writing text. The text must be formatted using character styles that are set up in the Window -> Styles -> Character Styles palette.
Set table styles
- To set table styles, open the Window -> Styles -> Table Styles palette in InDesign.
- Here you can create new table styles and specify how the tables from WordPress should look in InDesign.
You need the name of the table format to be able to map the table formats. How this works, you can read under Tables in WordPress.
Special text formats
Follow-on styles
If you need more than one style within a text box, you can define follow-on styles. This allows you to specify within a paragraph style how subsequent paragraphs are to be formatted.
- Under Paragraph Styles, click the format for which you want to define a follow-on style.
- In the General tab, under Next Style, select the paragraph style that is to be used as the subsequent style.
- Confirm the settings with OK.
Upload Page Template
- Open the administration menu of the Planner.
- In the menu on the left, under Layout, select Page Template.
- Click the + button. A dialog box will open.
- Enter the name and, if necessary, the group name of the page template.
- Select the desired InDesign document.
- Confirm your entries with OK.
Changes to the Page Template
- If you have made changes to a page template, open the Planner administration menu.
- Upload the page template again. Alternatively, you can also edit an existing template.
- Reassign the template to the publication.